Getting Started
Welcome to Copiix Console v3! This comprehensive guide will walk you through the complete setup process, from initial download to your first successful copy trading operation. Follow these steps carefully to ensure optimal configuration and security.
System Requirements
Before downloading Copiix, ensure your system meets the minimum requirements:
Operating System
- Windows 10 or later (64-bit recommended)
- Windows Server 2016 or later for VPS deployments
- .NET Framework 4.8 or later
- Visual C++ Redistributables (automatically installed if missing)
Hardware Requirements
- RAM: Minimum 4GB, recommended 8GB+ for multiple terminals
- Network: Stable internet connection (minimum 1Mbps)
- CPU: Dual-core processor, quad-core recommended for heavy usage
Trading Platform Compatibility
- MetaTrader 4: All build versions supported
- MetaTrader 5: All build versions supported
- cTrader: Desktop version 4.0 and later
Download Process
Downloading Copiix requires attention to security and authenticity. Always verify you're downloading from official sources to ensure software integrity.
Official Download Source
Navigate to the official Copiix website: copiix.com/last/release/
Security Verification:
- ✅ Verify SSL certificate (HTTPS connection)
- ✅ Check domain authenticity (copiix.com)
- ✅ Download file hash verification (when available)
- ✅ Antivirus scan recommended
Version Information
Each Copiix release includes:
- Console Application: Main web interface
- Terminal Files: MT4 EA, MT5 EA, cTrader cBot
- Configuration Templates: Sample configurations
Security Warnings and Safe Sources
Unofficial Sources
Never download Copiix from unofficial websites, file-sharing platforms, or third-party repositories. Unofficial versions may contain malware, outdated code, or compromised security features.
Red Flags to Avoid:
- 🚫 File-sharing websites (MediaFire, Mega, etc.)
- 🚫 Torrent sites or P2P networks
- 🚫 Unknown domains or subdomains
- 🚫 Social media direct downloads
- 🚫 Email attachments from unknown sources
If You Encounter Suspicious Sources:
- Don't Download: Avoid any suspicious links
- Report to Team: Contact Copiix support immediately
- Telegram: Report via @Copiix
- Email: Send details to support@copiix.com
- Community Alert: Help protect other users
File Verification
After downloading, verify file integrity:
# PowerShell command to check file hash (example)
Get-FileHash -Path "Copiix-3.zip" -Algorithm SHA256
Digital Signatures
Future versions will include digital signatures for enhanced security verification. Check the download page for the latest security features.
Legal Disclaimer
Read and understand the official disclaimer before downloading and using Copiix. This document contains important legal information, terms of use, and risk disclosures.
Installation Process
Copiix follows a portable application model, requiring no traditional installation. This approach provides maximum flexibility and security.
Extraction and Setup
- Create Directory: Choose installation location (e.g.,
C:\Trading\Copiix) - Extract Files: Unzip the downloaded archive to your chosen directory
- Verify Structure: Ensure all files extracted correctly
Copiix-3.exe - Check Permissions: Verify folder has read/write permissions
Directory Structure
After extraction, you'll see:
Copiix/
└── Copiix-3.exe/
Antivirus Warnings
Modern antivirus software may flag Copiix as potentially unwanted software (PUS) because it's not Microsoft-signed. This is a false positive common with trading software. The warning appears as a blue Windows Defender screen.
Safe Actions:
- Click "More info" on the warning screen
- Select "Run anyway" to proceed
- Add Copiix folder to antivirus exclusions for future runs
First Launch and Initial Configuration
Starting Copiix for the first time initiates the setup wizard and initial configuration process.
Launch Process
- Navigate to Copiix installation folder
- Double-click
Copiix-3.exe - Console Interface: Copiix web interface loads
Initial Interface Overview
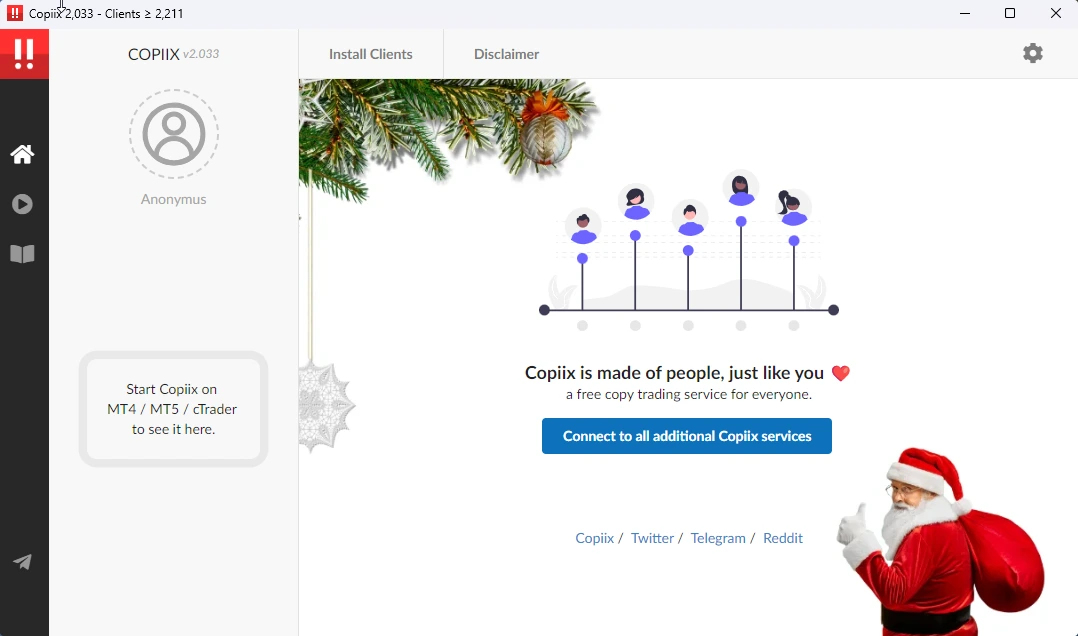
The Copiix Console opens with a clean, modern interface:

Interface Elements:
- Header Bar: Global controls and theme switcher
- Left Sidebar: Navigation menu and terminal list
- Main Area: Dashboard and configuration panels
Terminal Installation
To activate copy trading functionality, install terminal components in your trading platforms:
Accessing Terminal Files
- Open Settings: Click gear icon in header
- Navigate to Settings >> About: Find terminal installation
- Click on Install Terminals: All robots will be installed automatically.
Terminal Connectivity
After installing terminal components:
Launching Terminals
- Start Trading Platform: Open MT4, MT5, or cTrader
- Enable Auto-Trading: Activate automated trading in platform
- Verify Connection: Check Copiix Console for terminal appearance
Connection Verification
Successful terminal connection shows:
- Terminal appears in main area in Terminals section
- Platform identification (MT4/MT5/cTrader)
Single Instance
Launch only ONE Copiix component per trading platform. Multiple instances on the same platform will cause conflicts and error messages. Each terminal type (MT4, MT5, cTrader) can run simultaneously, but only one instance per platform.
Initial Testing
Verify your setup with basic functionality tests:
Connection Test
- Terminal Visibility: Confirm terminals appear in main area
- Status Indicators: Verify all connections show a color information
Basic Configuration Test
- Create Simple Setup: Configure one provider and one copyer
- Test Parameters: Apply basic money management settings
- Dry Run: Observe behavior without actual trading
- Error Checking: Monitor for configuration errors
Troubleshooting Common Issues
Terminal Not Appearing
Possible Causes:
- Expert/cBot not properly attached
- Automated trading disabled
Solutions:
- Verify Expert/cBot is active on chart
- Enable automated trading in platform settings
Performance Issues
Possible Causes:
- Insufficient system resources
- Multiple platform instances
- Network latency
- Background applications
Solutions:
- Close unnecessary applications
- Ensure single instance per platform
- Test network speed and stability
- Upgrade hardware if necessary
Next Steps
After successful installation and initial setup:
- Explore Interface: Familiarize yourself with console features
- Read Documentation: Study parameter configuration options
- Practice Configuration: Set up test scenarios
- Community Engagement: Join Telegram community for support
- Advanced Features: Explore premium upgrades when ready
